Unbox & pair the device
Connect to Wi-Fi, pair with your panel, set an Admin PIN, and reach the Connected screen.
Start pairing
![]()
![]() Terminal Setup Guide
Terminal Setup Guide
Welcome to your Credee Terminal setup guide. We’ve designed this process to be as smooth as possible so you can get your new terminal up and running and grow your business in no time.
HOW IT WORKS
Three phases. About fifteen minutes.
Let's walk through the main phases together: connecting the device, setting up your customer rewards, and adding your team.
Unbox & pair the device
Connect to Wi-Fi, pair with your panel, set an Admin PIN, and reach the Connected screen.
Start pairing
![]()
Tailor fees & rewards
Set your fee offsets, then build four kinds of rewards that bring customers back.
Build rewards
![]()
Get your team onboard
Add staff in minutes with full control over who can see and do what.
Add your team
![]()
01
Unboxing & Pairing the Device
To get started, head over to your Business Panel, navigate to the Terminal tab, and click Start Setup.
Next, plug your Credee Terminal into its charger and turn it on.
Simply follow the on-screen prompts on the terminal to connect it to your Wi-Fi network, then click continue.
Enter the pairing code from the terminal into the panel screen and tap Pair Terminal
Now, set up a 4-digit Admin PIN on the panel. You'll use this for quick login on the device later.
Give the terminal a few minutes to download and install the software updates automatically.
Log in with your Credee Admin Account on the terminal. Once you see the Connected screen, you are officially linked!
02
Tailoring Your Fees & Rewards
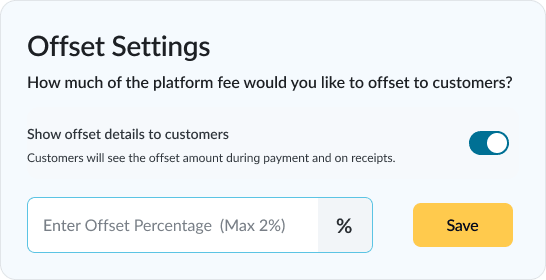
Setting Up Fee Offsets
Before setting up rewards, you’ll land on the Offset Fees screen. Here, you get to decide how to divide platform fees. You can choose to share up to 2% of the platform fee with your customers. You can also pick whether this fee is visible during the checkout process itself or just printed on the final receipt.
You can change these settings whenever you want. Hit Save when
you're ready to move on.
Activating Customer Rewards
A good rewards program is one of the best ways to get customers coming back. With the Credee Terminal, you can build four distinct types of rewards to grow your business:
![]() Always active
Always active
Video Review Reward
Want authentic face-to-face testimonials? Set this up so customers can record a quick video right at checkout. Click Create Reward, give it an exciting title, pick a theme color that matches your brand, and check out the live preview on the right. Hit save!
Create Reward
![]()
Social Engagement Reward
To create a Social Engagement Reward, enter a title, drop in your Facebook or Instagram links, pick your color, and check the preview. The terminal will show a dynamic QR code for customers to scan and follow you on the spot.
Create Reward
![]()
Check-In Reward
Boost your local Google or Yelp rankings by letting customers check in at your location right from the screen. Add your review links, customize the look, and save.
Create Reward
![]()
Referral Reward
To create a Referral Reward, enter a reward title and theme color, and save the reward. Referral rewards are shared through customer emails and are not displayed on terminal screens.
Note: If you turn on too many on-screen rewards at once, you might get a little pop-up warning you that the terminal screen could look a bit crowded. You may still choose to proceed if it aligns with your preference.
Once rewards are created, you can edit reward details, including titles, links, and theme colors. The Active/Inactive toggle controls the visibility of rewards on the panel, while the Show on Terminal toggle manages whether the rewards are displayed on the terminal screen.
03
Getting Your Team Onboard
Bring your staff onto the terminal in minutes — with full control over who can see and do what.
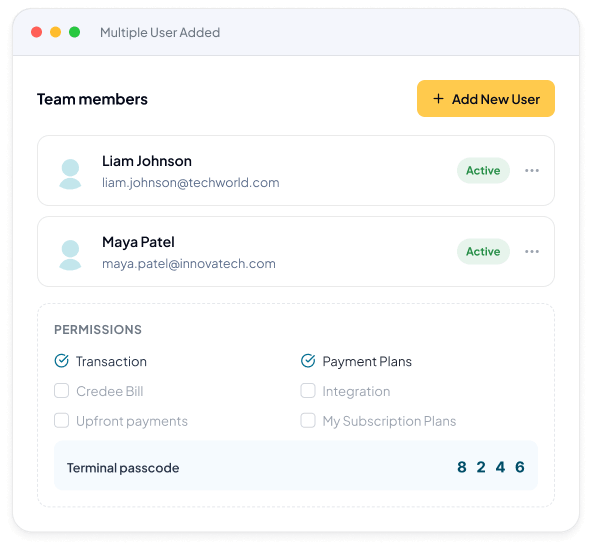
Add a new user
Click Set Up under the Manage User section, and select Add New User.
Enter details & assign a role
Fill out their full name and email address, and assign them a specific role. You can also generate a unique Passcode that the user can use to log in to the terminal.
Set their permissions
Check the boxes next to the exact permissions you want them to have. They'll only be able to see and do what you authorize.
Manage them anytime
Once created, the user will appear in your user list. From this dashboard, you can edit their details, delete the user, or resend their terminal passcode whenever needed.
Have More Questions?
